Continuous Integration and Continuous Delivery Start!
CI/CD Baby! We are here. I have always had a fine love for CI/CD pipelines. I don't know what it is about it. Seeing everything work together just makes me happy inside. Having a good and proper CI/CD workflow can help out in many ways
- Early Bug Detection
- Consistent Test Environment
- Better Collaboration
- Increased Test Coverage
- Reduced Time to Market
- Scalability
- Improved Stability
- Cost Savings
And many more
Would you also believe that we technically have been setting up a pipeline this entire time? That brings us to tools.
CI/CD Tools
One of the most popular tools ive seen used is Jenkins. Jenkins is an open source tool that allows for easy building, testing, and deployment. Github also has its own in GitLab CI/CD. There is also one of the tools we will be using which is pretty sweet called CircleCI Which is a cloud based CI/CD platform. The last one ill talk about, and we are also going to be working with is Github Actions, which we have technically been using the entire time without realizing it.
Checking out our workflow
Remember whenever we were downloading playwright,and the option of include git workflow? came up? that was playwright setting up a pipeline for us to use in the action workflow. Lets open some of our code to check it out. For this ill open our API tests that we completed.
Within our folder structure, There is a .github folder that contains a workflows with a single playwright.yml file. 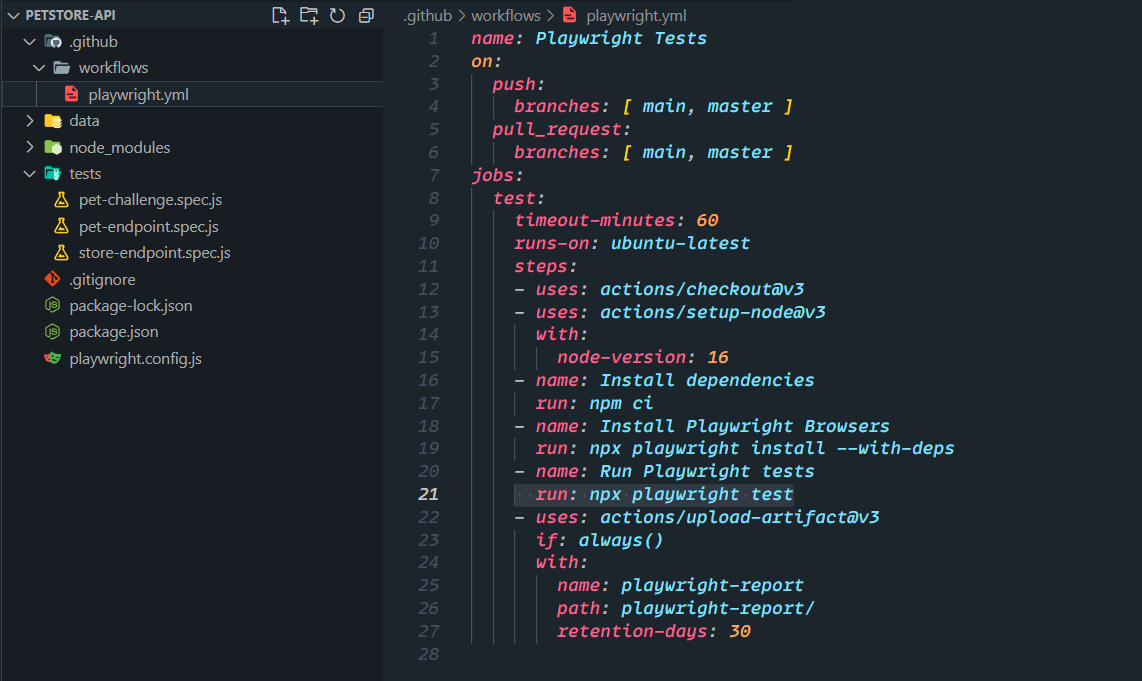
Lets go ahead and walkthrough what this does, and what it means.
# name of the Workflow
name: Playwright Tests
# on - Decide on what triggers the workflow
on:
# push -> on: push to the main, or master branch
  push:
    branches: [ main, master ]
# pull_request -> on: pull_request to the main, or master branch
  pull_request:
    branches: [ main, master ]
# run this job
jobs:
test:
  timeout-minutes: 60   # The maximum amount of time that this workflow is allowed to run before it is considered to have timed out.
  runs-on: ubuntu-latest  # Specifies the operating system and version to use for the workflow's virtual environment.
  steps:
    - uses: actions/checkout@v3  # Checks out the code from the repository into the workflow's virtual environment.
    - uses: actions/setup-node@v3  # Sets up the Node.js environment for the workflow.
      with:
        node-version: 16  # Specifies the version of Node.js to use.
    - name: Install dependencies  # Installs the dependencies required by the application.
      run: npm ci
    - name: Install Playwright Browsers  # Installs the Playwright browser dependencies.
      run: npx playwright install --with-deps
    - name: Run Playwright tests  # Runs the Playwright tests.
      run: npx playwright test
    - uses: actions/upload-artifact@v3  # Uploads the test report as an artifact.
      if: always()
      with:
        name: playwright-report  # Specifies the name of the artifact.
        path: playwright-report/  # Specifies the path to the directory containing the test report.
retention-days: 30 # Specifies how long the artifact should be retained before being automatically deleted.Whew. That seems like a lot and it kinda is. This is nearly step by step, what we have been learning this entire time right? In the very beginning of this course, we had to set up Node, we needed to install playwright with the browsers, we needed to run our tests with npm playwright tests and we could then save our HTML doc if needed. Everything we needed to do in the beginning of this course, sans creating the tests themselves, is included within this pipeline. Super cool stuff! One thing we can change however, since we are running these pet-store tests, is the Run Playwright tests step.
- name: Run Playwright tests  # Runs the Playwright tests.
run: npx playwright test --workers=1- name: Run Playwright tests # Runs the Playwright tests.
run: npx playwright testThis will change it to where it will only run one worker at a time in our pipeline. If you haven't already, lets go ahead and push this out to the github repo, to see the pipeline in action. ALso, it would be good to note that you should enable the HTML reporter to see the report in github actions as well.
Checking our run in Github
To see our workflow in action lets head on back to github. and click on the action tab. From here we should see our commit message under the workflow run, with our workflow. 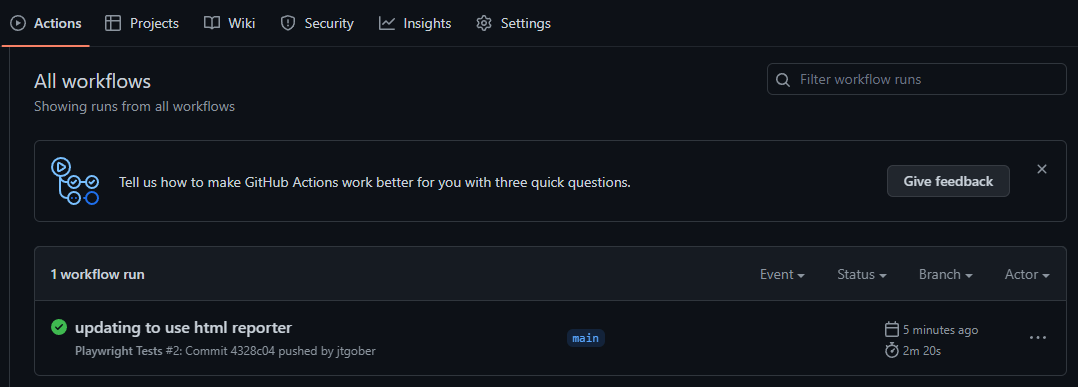
from here lets click on the workflow. From here we can see that our workflow was triggered from the on:push portion of our yml file. If your test is completed, you will also fine the playwright-report artifact here. If its not completed you can click the workflow and watch it working! 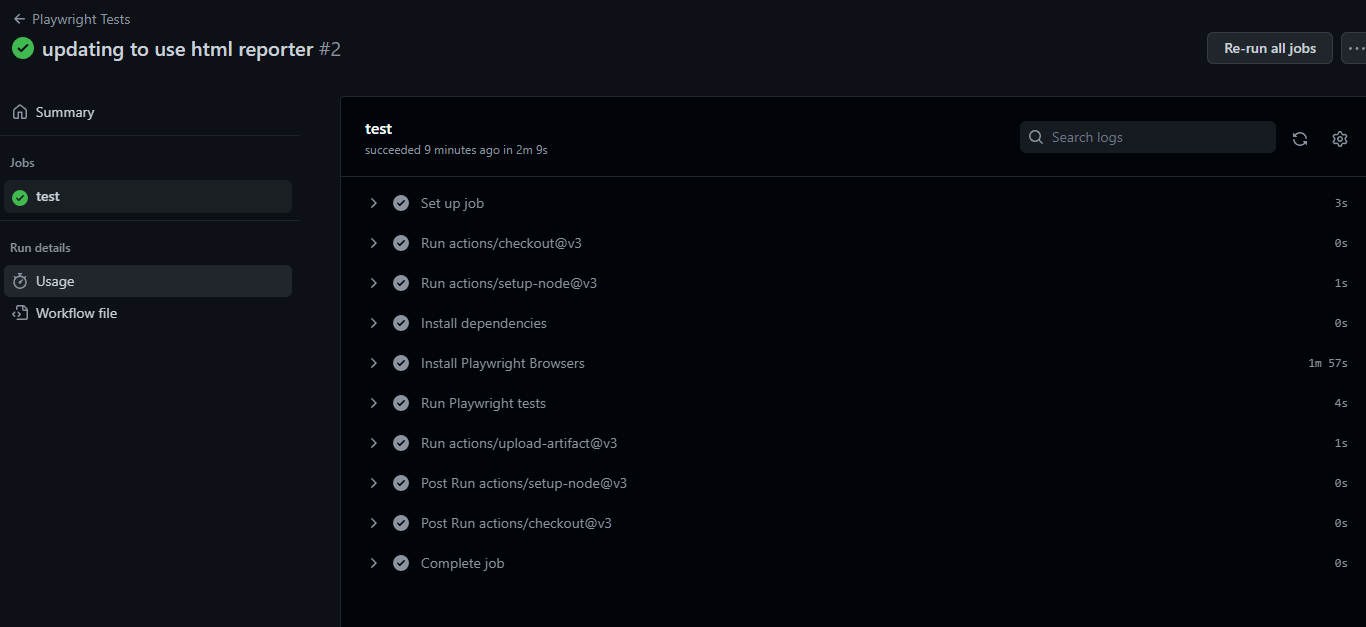
We can also see that the bulk of the time is coming from the install playwright browsers portion
Ok, I feel like this is getting a little long and this might be a good stopping point.